Native Oberon Installation Tutorial
My Toshiba Satellite with oberon
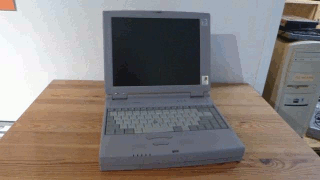
So you want to install native oberon. I now will tell you how the plan is to achieve that goal.
1. First i will tell you what hardware to choose and give you some examples of successful
installations on particular platforms.
2. We will download a free copy of MSDOS. We need DOS because a DOS partition is
an excellent silo for taking the oberon installation packages. Oberon easily can access DOS
and will take the package from there and install them on the system.
3. We need a tool to flash the DOS disk images on floppy as well as to flash the oberon boot floppy.
Assuming you are using Windows as your production platform WinImage will be our first choice.
I'll show you where to get a time limited version for free which is more than enough for
our needs.
4. We will install DOS. Prior to the installation we will use the install disks to create a DOS
partition of some MByte. We'll do this because we want to keep the DOS partition small
and reserve the rest for oberon.
5. We will download native oberon from sourceforge and install it. The installation of the native
oberon base system is straightforward.
Part 1: Knowing the hardware
Oberon is an operating system of the 80s and 90s. Thus it was designed for the hardware that was frequently
and commonly used back in those times. According to this fact you should try to get a machine that was manufactured
in this period. When you get a device with something betwen Intel 486(or compatible) upt to Pentium III you have
a head start already. The bus system should contain ISA and/or PCI. USB would be nice but i can't promise you we
will get it working for mass storage devices. But we will try!
You can find a good list of supported hardware here
The systems i can recommend for using native oberon are:
- Toshiba Satellite 1000 CDT
- Wincor/Nixdorf Beetle II
- HP Omnibook XE3
- LICA ST-5535WAL Thin Client (with CF-harddrive)
I will show you my oberon machines in more detail in a later tutorial. Your target device should have at least
- a 1.44MB floppy drive
- an IDE harddisk with something like 50MB or more
- a PS/2 or USB mouse with 3 buttons (Three buttons are crucial!)
If you want a tri-boot configuration with DOS, Oberon and Windows XP, like i did, you better should have a hard disk
with some GB. The tri-boot configuration is part of a separate tutorial.
Part 2: Downloading all you need
So lets start with MS-DOS. Open your browser and go to kirsle.net
where you may download the DOS 6.22 installation package. For now just save it to your hard drive.
The next thing we need is WinImage.Get you free trial copy and install it.
Now switch over to PKZip for DOS and get a copy to download.
Now last but not least go over to sourceforge.
Download the tar-gzipped installation package.
Part 3: Installing MS-DOS
Prior to installation we need to create the installation disks. Prepare three 1,44MB floppy disks and label them as
"MS-DOS Install #1..3". The downloaded DOS installation package is a zip-file. Unzip it and you'll see three image files.
- Dos622-1.img
- Dos622-2.img
- Dos622-3.img
Start Winimage, load each of these files and flash them on the respective floppy disk. After finishing you may throw
installation disk 1 into the floppy drive of your target system and start the installation. Before the dos installer asks you to
proceed you should press "F3" to abort the installation. Then you will end with a minimum DOS system in your machines
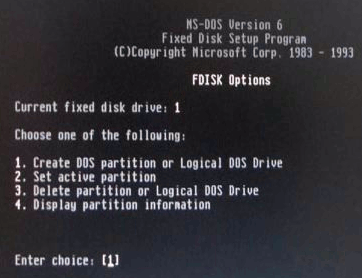
memory to go on. At the prompt type "fdisk" and start DOS hard disk utility. Use fdisk to create a primary DOS partition of
24MB. That's enough for the DOS system and the oberon installation packages we need to place.
Starting fdisk
Creating a primary DOS partition
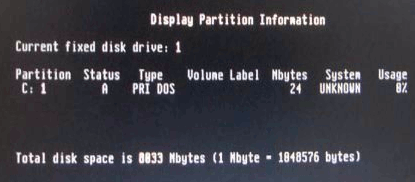
We do this because otherwise DOS would grab for the whole harddisk space for the installation and there would
be nothing left for oberon. Now reboot the system with the floppy still inserted and do the installation process. After
finishing you should be able to reboot without a floppy and get a DOS prompt on your screen.
Congratulations! You just finished level 1 and entered level 2!
Part 4: Preparing the oberon file package
Now things become a little tricky. First unzip the oberon zipfile to some location on your computers hard drive.
Take the time to look into the folder and at the files. You'll see a lot of additional zipfiles. These are the oberon
installation packages, each one with special functions. The one we are currently interested in is "Oberon0.dsk".
The oberon boot file
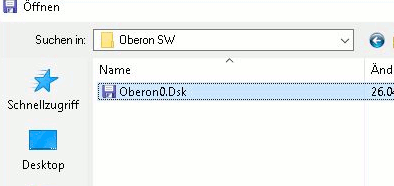
This is also an image file like the ones you just flashed on you DOS installation disks. So again it's a good idea to start Winimage,
load Oberon0.dsk and flash it on a floppy disk. After that please LABEL it! Believe me, if you're not doing it you'll get
confused by the time because we use floppies a lot in the installation process!
The next step is not related to the base installation of oberon but we should take the opportunity because we'll need this done
for the second tutorial where we will upgrade oberon with all available package. In this tutorial we will start with only the
base installation. Unzip the PKZip for DOS and transfer the files on a DOS formatted floppy. You may generate this floppy on your new DOS system by inserting an
empty floppy and executing "format a:". Never type "format c:" or your whole DOS installation will screw up! After storing
all the PKZip files on the floppy insert it into your DOS system. At the DOS prompt execute "mkdir c:\zip" and then
"copy a:\*.* c:\zip" and all the PKZip files will be stored in your new directory.
Now we go back to the oberon file package. After we did our oberon base installation we need to transfer all those
files to a subdirectory in DOS where oberon can grab them. If you take a close look at all those zipfiles you might recognize
that all of them have a nice size to be transferred by floppy disk because all of them are < 1.44MB. Well sadly
not every file. Look at the "Docu.zip" file and you'll see it has a size of 2.8MB! Now you might ask what the trick is to
put a 2.8MB sized file on a 1.44MB floppy? The answer is, there is no trick. Sometimes things just go wrong and people
make failures. So we have to do something about this issue. But, no problem, we'll get it fixed! Unzip "Docu.zip" into
a subdirectory named "Docu" or however you want to name it. You'll see it contains dozens of different files. Now it's your
turn to make an educated guess how to take those files and make 3 new zipfiles ot of them named "Docu1..3.zip"
each file having a size < 1.44MB. I won't gice endless lists of the files i used for Docu1.zip, Docu2.zip, a.s.o because you
can do this by yourself. It's not that hard!
The last thing to do is to transfer all those oberon zipfiles to DOS. First we have to create a suitable directory. On your DOS
system execute "mkdir c:\oberon". Then you take as much floppies as you want, put one into the floppy drive of your computer,
put some oberon files on it till it's nearly full, then throw the floppy into the drive on your DOS system and copy the files
by executing "copy a:*.* c:\oberon". Now stay on your DOS system in your oberon directory and create a subdirectory
"DOCU" by executing "mkdir C:\oberon\docu". Now transfer the three files Docu1.zip..Docu3.zip into this directory. After
putting one file on floppy on your computer insert it into the drive on your DOS system and type "copy A:*.* c:\oberon\docu"
The DOCU files on the DOS system
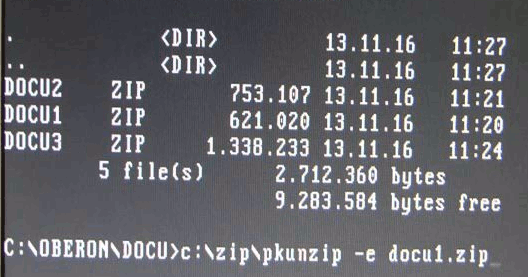
While you're in the DOCU subdirectory execute one after the other
- "c:\zip\pkunzip -e docu1.zip"
- "c:\zip\pkunzip -e docu2.zip"
- "c:\zip\pkunzip -e docu3.zip"
and all the three zipfiles get inflated. Don't worry if you get some overwrite warnings because some files seem to be duplicated.
I always acknowledged overwriting. You now may delete the zipfiles by doing "del *.zip". The last step now is to rearrange all
those files by putting them back into one big zipfile. So let's execute "c:\zip pkzip Docu.zip c:\oberon\docu\*.*".
Now you should see the file "Docu.zip" file in the directory copy it to the oberon directory by executing
"copy c:\oberon\docu\docu.zip c:\oberon".
Now you should have all the zipfiles in the oberon directory that you could see in the unzipped native oberon package on your
computer. The subdirectory "DOCU" is now obsolete. You may empty it by doing "del c:\oberon\docu\*.*" and then removing
it by doing "rmdir c:\oberon\docu".
All the steps you passed through you can also watch in my YT-Video
Part 5: The Oberon Base Installation
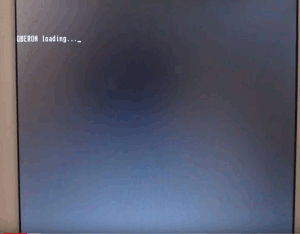
Now take off your silk gloves, here comes the hard part. We will do our first booting in oberon. Throw the oberon boot
floppy in your floppy drive of your (still) DOS computer and reboot the system. If everything works nicely the system will
come up with an oberon loading message.
Oberon is loading
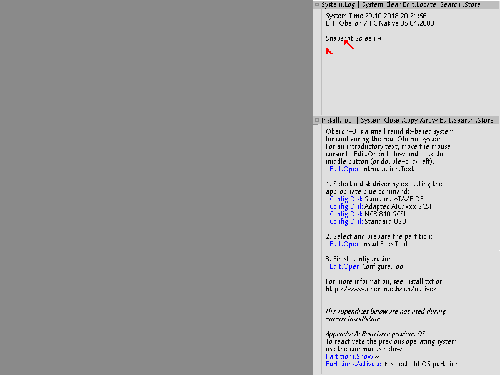
In the following seconds you might see a grey rectangle surrounded by a rim that is continously flickering and changing
it's colors. This is normal because oberon tries out different screen drivers and settings. If the power is with you you
finally should see the screen of a minimum sized oberon system residing in a virtual drive inside your machines memory.
Oberon is loading
Working in Oberon
Now you have to adopt some quick and basic informations about operating oberon. Oberon is operated with a 3-button mouse as it is
the same with Windows or Linux. But apart from moving the mouse the operations are quite different. Here are the facts
on the oberon mouse buttons in the most minimal meaning:
- The left button places the cursor(caret) for writing text
- The middle mouse button calls commands
- The right mouse button selects text
Some special operations can be done with the star marker. This is an indicator for a position where you want to place
a viewer or where a gadget is placed you want to access. The star marker is placed by moving the mousepointer to the
respective postition and hitting "F1". To undo the star marker and undo any selections made just press "F2".
While the meaning of the left button is obvious it is not for the middle button. What does "calling commands" means?
Well oberon provides textual commands that are organized in modules. A module can be seen as an object exporting
several methods that may be invoked. The structure of modules and commands (we rather call them procedures) follows
the dot notation you might know from programming in C++ or java. It's always
module.procedure
So if you want to look at the contents of a directory you'll use the command "System.Directory". That means the module
"System" exports a procedure named "Directory". Both words are separated by a dot. Invoking the command is done by
placing the mousepointer over the words "System.Directory" and then clicking the middle mouse button, that's it!
Now you might ask where you find the command to click on. That's easy! Oberon may invoke commands from literally
EVERYWHERE on your desktop where it's written as text. It doesn't matter in which window, track or gadget it is.
You may call it from everywhere! That's one of the most awesome features of oberons TUI (Text User Interface). But beware of
one danger. Oberon is CASE SENSITIVE! So if you write something in capital letters that should be not, don't wonder if
oberon tells you it doesn't know the command!
The second thing is the screen organization. In oberon the screen is tiled into tracks. The right track is reserved for
system near functions and generally contains the System.Log. This is an extremely important user interface. Everything
oberon does it is documenting in the system log as a message. But you can also use the log to write commands into it
and then calling them as i explained to you before. So the Log is a versatile input/output feature. The left track is wider
and used for user applications. Most applications open some kind of window in a track. In oberon we call them "viewers".
A viewer may be stretched if you grab the upper left corner with the mouse, click and hold the left button and then dragging
the mouse up or down enlarges or shrinks the viewer.
Normally oberon decides for you where to open a new viewer but if you want it to appear at a specified position you may
place the mousepointer where you want it to appear and press "F1". You'll see a small star shaped marker apperaring at
the mousepointer's position. If you're now opening a viewer it will be placed just there.
A last thing you need to know now is that the oberon installation always starts with an english keyboard setting. If you're
using another keyboard like i did (german) you're principally in trouble because we need some characters like '#', '~' and
others that will not be where our keyboard shows them. I'd recommend to try out all characters by pressing the keys
and using ALT, SHIFT, CTRL and ALT-GR and write down the respective key combinations for the desired characters.
After the installation we may install another keyset.
The last thing you must know is scrolling. Scrolling in oberon is a bit faky because the scrollbars look the same as in windows
and your attemped to use them the same way which won't work. In oberon you place the mousepointer directly ON the
scrollbar. When you click left the viewer is scrolling down. When you click right the viewer is scrolling up. The scrolling steps
done with every mouse click are depending on the distance bewteen the mousepointer and the upper and lower rim of
the viewer. For example placing the mousepointer just a little under the upper rim is causing the viewer to scroll down in
small steps with every left mouseclick. The same applies backwards if you place the mousepointer just a little above the
lower rim. The more you move the mousepointer to the middle of the scrollbar the bigger the steps become.
Placing the mousepointer in the scrollbar with a middle mouseclick are causing the viewer to scroll to a respective position
in the document. E.g. placing it right in the middle of the scrollbar will cause the viewer to display the contents around
the middle of the document.
Installation
Now the basic system is already running in computers memory but we want it to reside on our harddisk of course because
booting from floppy is tedious. So we need an oberon partition first. Time to get in touch with the first tool in oberon.
Don't worry, a tool is nothing more than a describing text with lists of oberon commands. So it's absolutly readable!
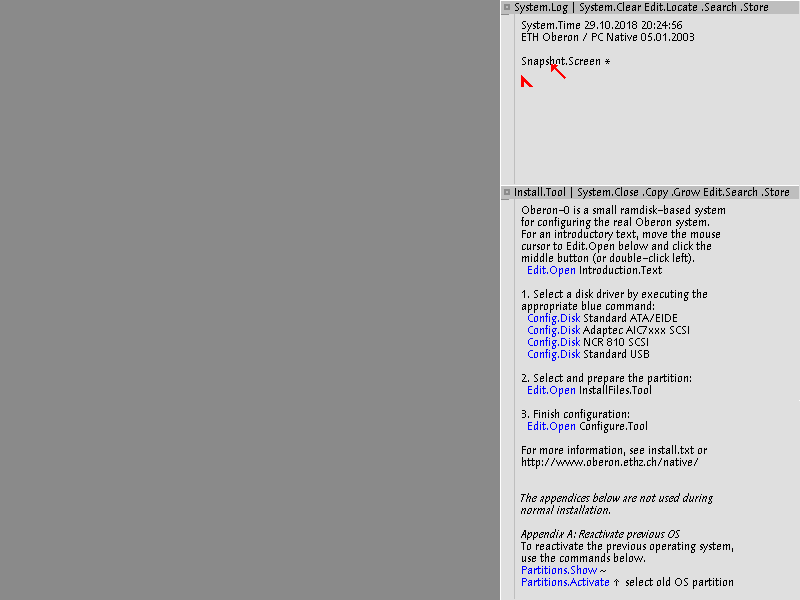
Luckily our tool is already opened. It's the "Install.Tool" which is placed in the middle of the system track on the right.
It contains everything we need to do the job.
The Install.Tool
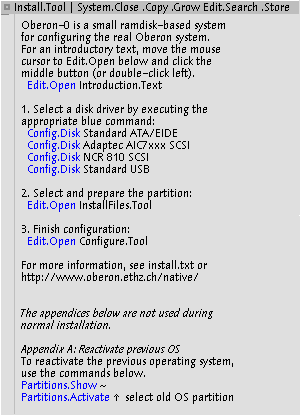
First we need to load the appropriate low level driver for the hard disk. Assuming you have an IDE drive you need to
middle click on
Config.Disk Standard ATA/EIDE
Now the driver is loaded we may proceed with some commands that are stored in another tool. So middle click on
Edit.Open InstallFiles.Tool
See how the InstallFiles.Tool openes left in the user track showing you lots of delicious commands to click on!
Take the first line with the command "Partitions.Show" and middle click on it. Another viewer openes below the actual
one showing you the partition table.
Checking the partition table
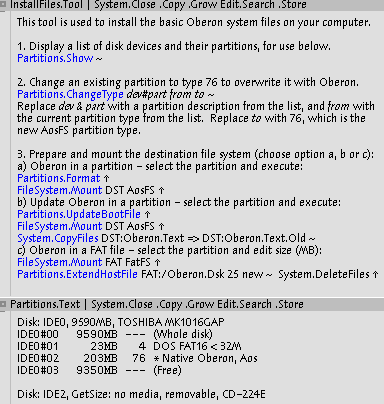
The first thing you'll see is that oberon names drives "IDE0....". This is of course only
valid for IDE drives. If you'd have SCSI drives the prefix world be "SCSI". Now you see a hashsign (#) after the drive name
followed by a 2-digit number. This is a partition number. To stick to our example the first harddrive found is "IDE0" and the
first partition on it is "IDE0#01", the 2nd one is "IDE0#02" a.s.o. while "IDE0#00" always stands for the whole disk.
Furthermore you can see that the first partition is the 23MB DOS partition we created and the rest is empty. So why we
do not take the opportunity to create an oberon partition now?
Now we want to create an oberon partition. So place the caret into the System.Log and write:
Partitions.Create IDE0#02 200
Middle clicking on this command will create a 200MB oberon partition which is more that we may ever fill with life.
Before we can use the partition we must format it. Now read this following remark! In order to save my time from now
on i will not say "place the caret into the System.Log, write blabla.bla and click with the middle mousebutton on it"
anymore. I just will say "execute the command blabla.bla" OK?
Good! You should see a message in the Log that the partition was created successfully.
Now use the mouse to select the text "IDE0#02" in the Partition.Text viewer and execute
Partitions.Format ^
in the InstallFiles.Tool. Now the partitions gets formatted. Isn't this cool? You just applied selected text as a parameter
for an oberon command saving you time and useless errors. I will explain more on this feature later.
Now you should see a message output from oberon showing you the partition is being formatted and giving you a
progress indicator. Hopefully the process finishes without error. Before we go on we must mount the new formatted
drive in order to place the installation there. We apply the same trick as before to make this task easier.
Again select "IDE0#02" in the Partitions.Text viewer and then click on
FileSystem.Mount DST AosFS ^
The mount message in the System Log should give you another "WOW!" effect i hope. We are ready now to install the
oberon files on disk. To do this middle click on the "Configurations.DoCommands" line in chapter 4 of the InstallFiles.Tool.
Start the installation
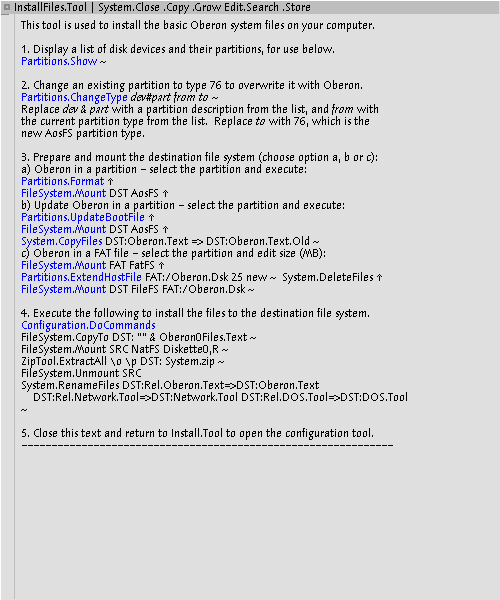
The "Configuration.DoCommands" command is a little special. It allows to run several single oberon commands one after
the other in a form of a script. So by clicking on it all the commands you can see below "Coonfiguration.DoCommands"
are executed up zo the '~' sign which indicates the end of the script. This whole process takes a while. Time for you to
get yourself a good cup of coffee and enjoy your success!
After finishing the installation close the InstallFiles.Tool by left clicking on "Close" in the viewers menu-line. Now open again the
"Install.Tool" by clicking on "Edit.Open Configure.Tool" in the Install.Tool that still resides right in your system track. The
Configure.Tool is opened left in the user track. Take look at it. First we are presented a collection of display drivers. In the
installation oberon normally uses always the VGA 256 color mode (8 bit) that is provided by every video card. If you know
the hardware configuration of your system you now have the opportunity to choose a driver that might get the most out of
your video hardware.
Selecting a display driver
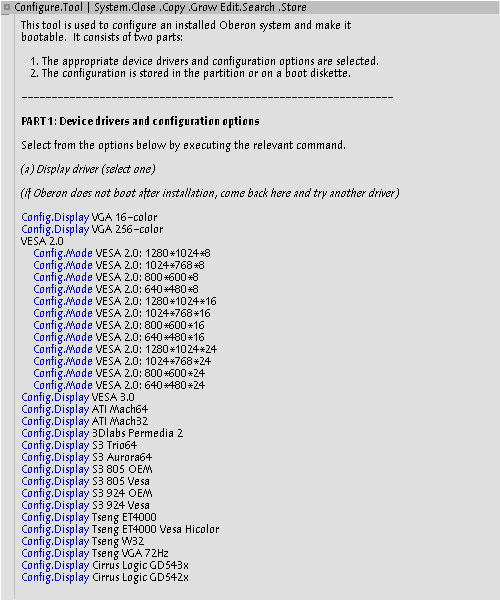
You see you have get a hierarchical list of drivers where you can unfold subdrivers each belonging to a family of drivers. Choose the
one you have. It's a good idea to consider suitable video cards when you are looking for a system to install oberon on. There
are still a lot of old cards from Tseng, S3, a.s.o available on Ebay. If you don't find your video hardware in the list don't worry.
You can try VGA16 or what's also working in most cases is VESA2. If you're choosing a driver that won't work with your video
hardware your system will not boot. But this is not a problem. Just follow my steps at the end of this tutorial.
You have to click on the driver of your choice with the middle mousebutton to select it and you'll get an appropriate message
in the System.Log then. Now scroll down the Configure.Tool until you can see
Config.BootPartition menu ~
Middle click on it. Now oberon saves the hardware settings to your oberon bootfile on disk. Actually we almost made it now!
One thing remains to do. Remember that the DOS partition on our hard drive is still active. Thus it will be booted always
on restart. We have to change this. Luckily the Configure.Tool provides everything we need. Just go one line down and
middle click on
Partitions.Show
You see the ususal Partitions.Text opening below your Tool viewer. Now select the string "IDE0#02" with your mouse and
the right mousebutton. Go up again and middle click on
Partitions.Activate ^
Now press "F2" to undo the selection and select "IDE0#01" instead, that is our DOS partition. Go up again and middle click on
Partitions.Deactivate ^
The DOS partition is now deactivated and oberon is activated. Well done! Now go down to the end of the Text and click on
System.Reboot
and don't forget to pull out the boot floppy before. If you have chosen the right video driver oberon should now reboot
properly and can stop reading now. In case booting does not work you likely have chosen a wrong display driver. Don't panic!
Here is what you need to do.
- Reboot again with the boot floppy inserted
- Do the "Config.Disk Standard ATA/EIDE" from the Install.Tool again
- Place caret in System.Log. Type and execute "FileSystem.Mount DST AosFS IDE0#02"
- Place caret in System.Log. Type and execute "Edit.Open Configure.Tool"
- Choose another display driver
- Scroll down and execute "Config.BootPartition menu ~"
- Scroll down and execute "System.Reboot" or press CTRL-ALT-DEL
Do this until you get a running oberon system.
Native Oberon Running
Back to main page
(c) 2018 Native Oberon Tutorials


